To take the best photos of mountain bike tricks, focus on the technique, composition, and timing. Tips compiled from experts can help you capture dynamic shots, accurately capturing (and even slightly enhancing) the extreme nature of the feat. By combining these techniques, you can create stunning, action-packed images that truly capture the excitement and skill of mountain bike tricks.
Key techniques
Positioning: Choose a spot strategically according to the jumps, drops, or technical features. It’s important that you can see the rider advance so that you can be ready to capture the right moment.
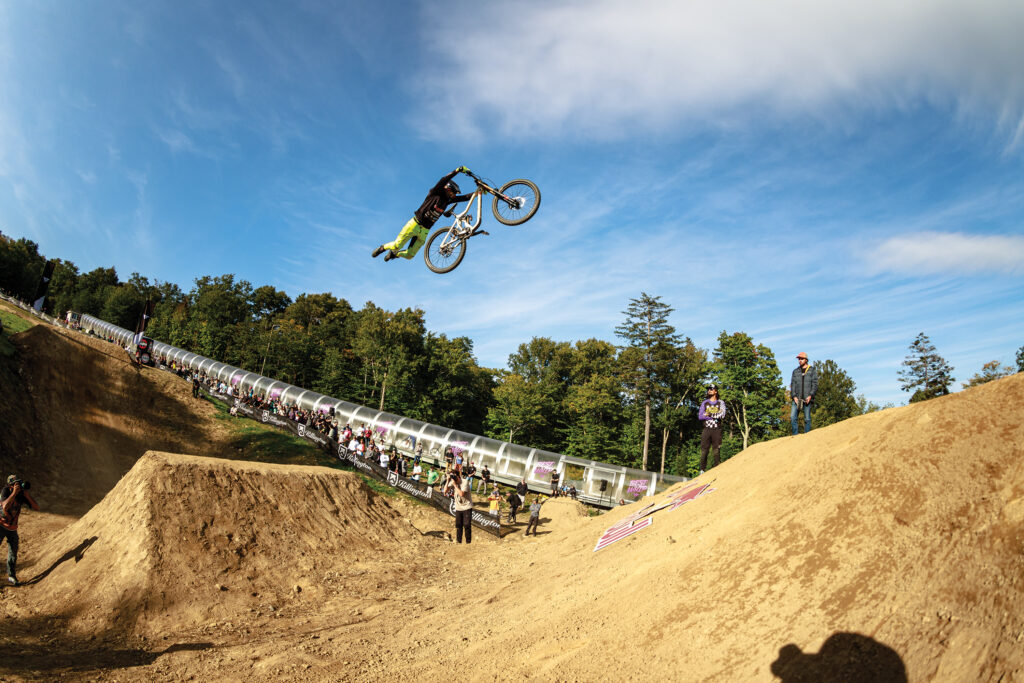
Angles: Shoot from low angles to create a sense of height and drama. To achieve this, position the camera slightly below the jump or trick. Side angles can highlight the motion of the trick and offers a balanced view of the bike, rider and scenery including the jump or featured element. Shooting from above can also add depth and scale, as well as a uncommon perspective.
Communicate: Talk with the rider to ensure they understand the trick, angle and effect you want to capture. This helps them look natural and confident in the photos. Depending on the angle, facial expressions could be a crucial element, too.
Use burst mode: Shoot in burst mode to capture multiple shots in quick succession, increasing your chances of getting the perfect trick at its peak.
Freeze the action: Use a fast shutter speed (1/500th of a second or faster) to freeze the rider in mid-air or at the key moment of the trick. This highlights the intensity and skills.
Motion blur: For a sense of speed, try panning—lower your shutter speed to around 1/30th to 1/100th of a second and follow the rider as they move. This keeps the rider sharp while blurring the background, emphasizing motion. Panning takes practice. Experiment with slower shutter speeds and follow the rider smoothly.
Composition tips
Frame the rider: Pay attention to the background behind the action. Use natural elements like trees, rocks, or archways to frame the rider and draw focus to the subject. Make sure the background won’t distract or camouflage the subject you’re trying to highlight. Bright clothing and helmets make the rider stand out even more.
Scale: Include the trail or landscape beyond the feature to give context and emphasize the scale or challenge of the trick. A rider in mid-air is less impressive if there is no ground below to tell how far up he/she is from landing.
Lighting and equipment
Lighting: Photography on the trails can be tricky. Too much sun can create harsh shadows; too little light can make shots dull or underexposed. Consider moving into the forest if it’s a bright day or onto more open sections of trail if it’s overcast.
Lens: Wide-angle lenses capture both the rider and the landscape, while telephoto lenses zoom in on the action and compress the background. The lens you choose will also depend on your position related to the feature.
Back-ups: Bring spare batteries, memory cards, and portable chargers.
Killington Resort
Best Whip
Summer 2022
Download the 2025 GRIP magazine.