Staff report
So, you bought a mountain bike. Well done! You’ve now got a few epic rides under your belt. Excellent. But now you wonder how to best protect your investment and keep it rolling like new. While there are many expert bike mechanics around locally that can help, here are a few basic things that you can do at home to save you time and additional expense.
Before every ride
Check tire pressure to ensure tires are inflated to the desired pounds per square inch (psi). Measure with a gauge. (Recommended psi depends on tire size: 26”-27.5” = 40-50 psi,
29” = 35-45 psi.)
Check the hub integrity and wheel trueness by moving the wheel side to side while holding the seat or fork; any play may indicate a loose bolt or compromised hub. Tighten with a hex wrench set. Next, spin the wheel and check for trueness and brake drag.
Lube, then wipe down your chain. Experts recommend lube once per every 2-3 hours of riding; wipe off any excess oil.
Check thru-axles and quick release tension to ensure that they haven’t rattled loose or come undone.
Wipe/rinse off excess dirt and mud after each ride. Dirt that’s left on the components can absorb grease and lubricants, causing them to dry out faster and cause grinding on your next ride which will wear out parts over time. Wiping off dirt instead of washing your bike is preferred if it can get the job done. If extremely muddy, use a low water pressure and bike-friendly soap.
Every 3-5 rides
Check brake pads (especially if downhill riding in wet conditions). Shine a flashlight into the brake assembly so you can clearly see the brake pad backing, brake pads, and rotor. If very little brake pad thickness remains and the brake pad backing is almost touching the rotor, it’s time to replace your brake pads.
Check shock/fork air pressure. Like tires, air shocks slowly lose pressure over time. You’ll need a shock pump to gauge and add pressure, which should be done according to your bike manufacturers recommendations for weight.
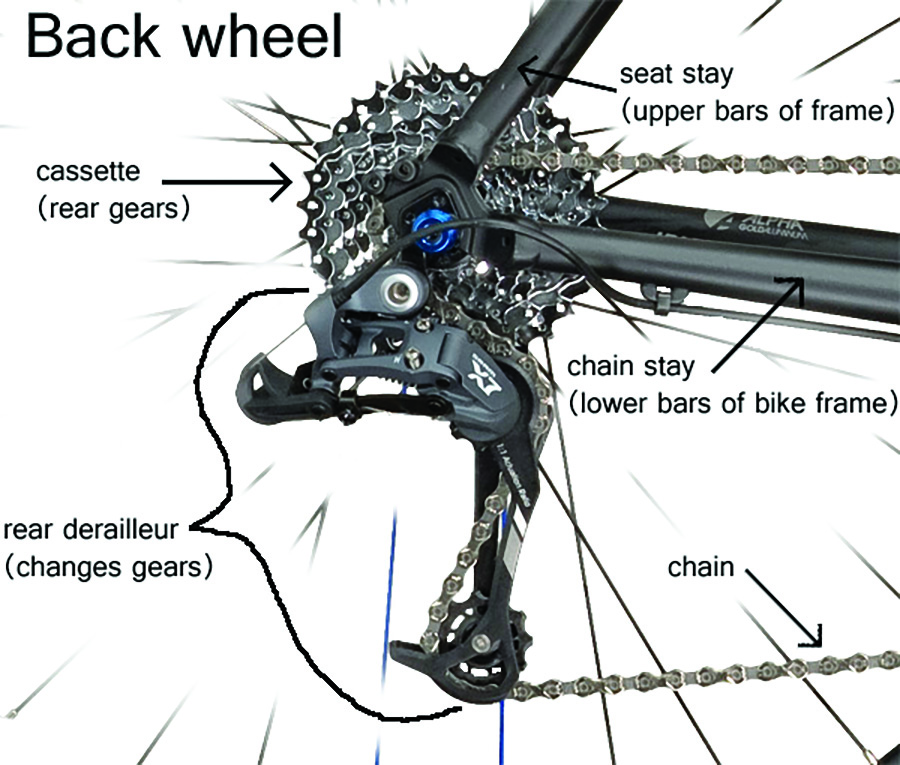
Check for chain wear. As chains wear between the pin and bushings formed into the inner plate, the chain grows in length. While it’s a myth that they “stretch,” they do wear down causing it to appear that way. As a chain becomes worn out, the cassette tends to wear with it. Installing a new chain on a worn-out cassette will cause skipping, as will a new cassette paired to a worn chain. Therefore they are best replaced at the same time. But it’s best to replace the chain before it takes out your expensive cassette! The only way to know if a chain is really worn out is to measure it. Most chain manufacturers say that a chain is worn out when it reaches 0.75% elongation. You can buy a chain-checker devices online or you can simply use a ruler to measure the distance between outer pins. A new chain will measure 12 inches from center to center of the pins. Any measurement over 12 1/16 inches indicates it should be replaced.
Check bolt tensions. Loose parts can create problems fast; if your bike feels funny or is making mysterious noises, stop and figure out why. It’s usually something that’s worked itself loose. Its a good idea to carry a hex wrench with you on longer rides.
Every 6 months – 1 year
Then there’s the more complicated stuff that most non-professional riders will go to a bike shop to service. (Of course, you can learn to do it at home and there are many video tutorials to show you how, but the tools, time and skill required is likely best left to the experts for most.)
Some such yearly tune-ups could include:
1. Service fork lowers. Change out seals and fork oil.
2. Bleed hydraulic brakes. Flush if fluid is darker than normal.
3. Thoroughly clean drivetrain including chain, cassette, derailleur pulleys, and chainrings.
4. Check tubeless tire fluid sealant. Verify that no cuts or wear are causing fluid to leak out; add more sealant if low.
5. Check tire tread and sidewall integrity. If low get new tires (sidewalls should be checked more frequently, especially before longer rides).
6. Service rear shock.
7. Service frame. Fully disassemble and clean all linkages, headset and bottom-bracket; replace bearings as needed and re-grease all mating surfaces upon reassembly.